I’ve been into landscape photography for a couple of years now. It’s a fantastic hobby and hugely rewarding, but also has a bit of a learning curve. While I would not consider myself anywhere near a pro at this stage, I’ve picked up on a few useful things here and there. Below are some tips which I hope others who are just starting out in the world of landscape photography will find useful.
Why You Should Research Your Locations
If you are planning a photography trip then it’s important to do some research beforehand. Use the internet to find as much information as you can about your destination. Try to identify potential places of interest and find out the best times of the year to go – some places are much more photogenic in certain seasons while others look great all year round. Try to avoid peak tourist seasons though, as busy places mean more people to get in the way of your shots.
There are some great tools to help you prepare for your trip. Google Maps and Google Earth allow you to get a good idea of exactly how things will look and, in some cases, even enable you to compose your shots from the comfort of your computer! Not all locations have detailed views available but at the very least you can get a rough idea on potential spots to visit.
Another great tool for landscape photographers is The Photographers Ephemeris. This piece of software will tell you the exact time of sunrise, sunset, moonrise, and moonset at any given date for any location in the world. Not only that but it will also show you the direction that the sun and moon will be at those times. By knowing exactly where the sun will rise or set, you can plan your shots accordingly.
Whether you are planning a trip or shooting locally, have a look at photos that other landscape photographers have taken in the area. This will give you ideas on potential places to shoot, but don’t simply go and copy their photos, put your own take on them.
Do Some Area Scouting
Once your trip has started the research isn’t quite over yet. While the internet allows you to plan and prepare for your trip, nothing beats being on location in terms of finding the best spots to take photos from. Explore the area in the middle of the day when the light is too harsh to take photos. Doing this enables you to pre-visualize your shots and get some compositions in mind before the actual shoot. The last thing you want to be doing when the light is right is desperately trying to find some good compositions.
This is the most time-consuming and tedious part of a photography trip but unless you have a guide or know the area well, it’s a necessary evil.
Getting Great Composition
Once you have found a good location you still need to decide how to compose your shot. This is a very subjective area and it’s quite hard to describe what makes a good composition and what doesn’t. The best photographers just seem to have ‘a good eye’ for a shot – an innate ability to frame a scene in such a way as to engage the viewer and take the shot from the best possible angle. There are ‘rules’ that you’re supposed to follow, but some of the most amazing photos break these rules so it really comes down to each individual photo. However, keep these guidelines in mind when composing your photos:
- Avoid clutter. Only include things in the frame that you want to present to the viewer. The best photos are clean and simple. If there are unwanted items in the way, such as power poles, cars, roads, buildings etc, try a different angle to hide them from view. Small things can be cloned out in post-processing but larger items will just distract the viewer.
Simple compositions are often the best.
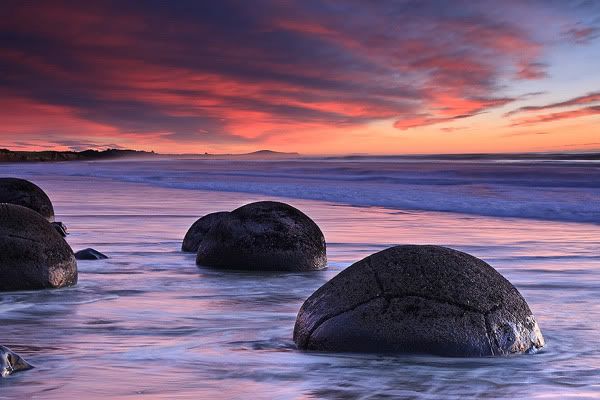
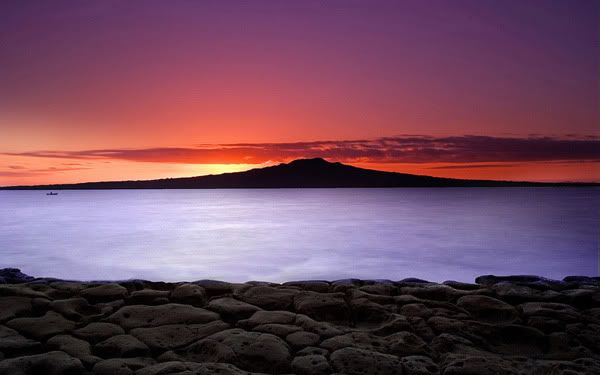
- Include foreground interest. Don’t take a photo of a sunset and rely on the colorful sky to make your photo interesting. Foreground elements such as rocks, water, etc help to balance out the photo and also draw the viewer into the shot.
A collection of rocks can make for great foreground interest.
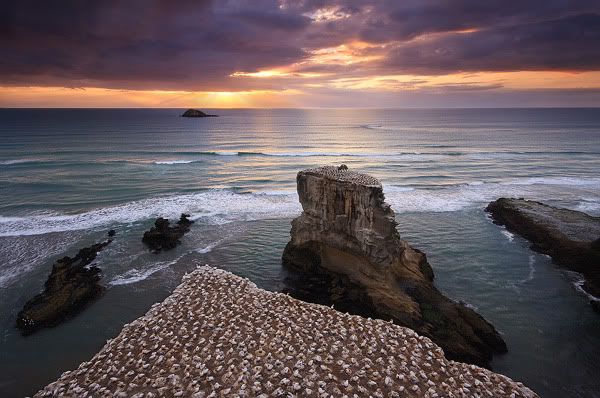
- Leading lines are a great way to draw the eye into the photo. Piers, jetties, and roads are obvious examples but also keep an eye out for interesting rock formations.
Using rocks to create leading lines.
- Avoid placing the horizon or the focus of the photo in the dead center. Use the rule of thirds as a guide in framing your shot.
Don’t forget to treat all of the above as guidelines only. Rules are meant to be broken!
Waiting for the Light
Once the hard work of scouting has been done, it’s now a matter of turning up to your chosen location and waiting for the right time to click the shutter. This is, however, when things become out of your control and you are completely dependent on Mother Nature.
The best times for taking photos are the hours around sunrise and sunset, commonly referred to The Golden Hours by photographers, as these are when the light is at its best. During the day, outside of these hours, the light is usually too harsh and flat, resulting in washed out colors and boring photos. There are exceptions of course, but most good-quality landscapes would be taken within the Golden Hours.
Once you have set up your shot, it’s just a matter of waiting for the light. Easier said than done! Some days (actually a lot of days), Mother Nature just does not want to play ball and the spectacular sunrise or sunset you are expecting never eventuates. This is, in my opinion, the hardest thing about landscape photography – no matter how much effort you put into planning and preparation, no matter how good your gear is, and no matter how skilled you are as a photographer, if the light is not right then you won’t get any good photos.
Those days are hard to take – coming back empty-handed after getting up at 4am for a sunrise shoot is never fun – but when things come together those days are quickly forgotten. There is no better feeling for a landscape photographer than when the light is good and you capture those magic moments with your camera.
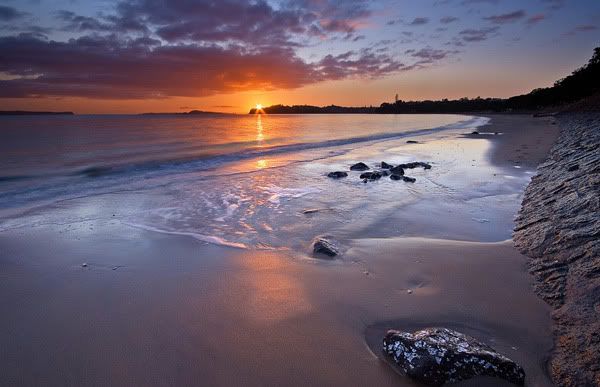
It’s all worth it when everything comes together.
Types of Lighting
There are different types of lighting, depending on where the sun is. The type of lighting you use is sometimes dictated by the scene you’re trying to capture, however at other times it offers you a variety of compositional choices and therefore lighting. It’s generally accepted that side-lighting – where the sun is coming from either the left or right of camera – is the most desirable for landscapes. This is due to the contrast between light and shadow caused by the directional light which adds depth to your photos. However front- and back-lighting, where you shoot directly away from or into the sun respectively, can also produce nice photos.
I tend to shoot directly into the sun in a lot of my photos as I find that is generally the direction where the most intense colors occur. To do this it’s best to wait until the sun is very low in the sky or below the horizon to avoid lens flare. With the sun higher in the sky, side-lighting is the best approach.
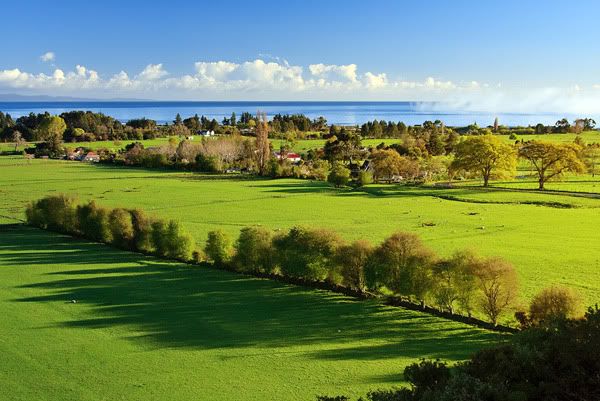
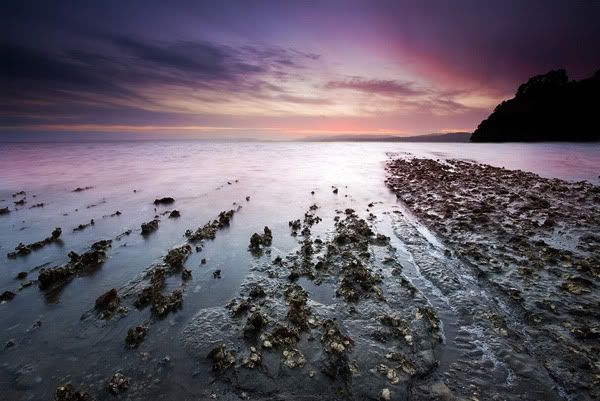
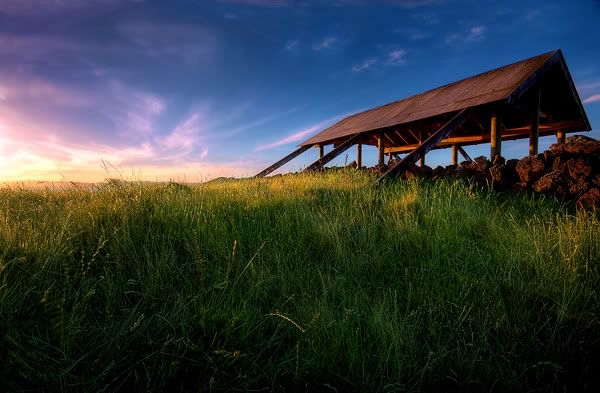
The side-lighting here produces long shadows adding shapes and texture to the photo.
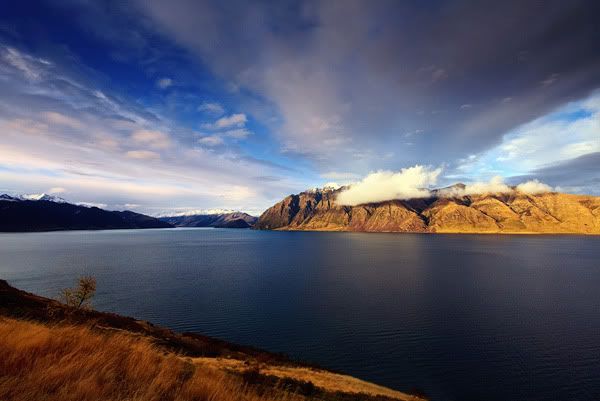
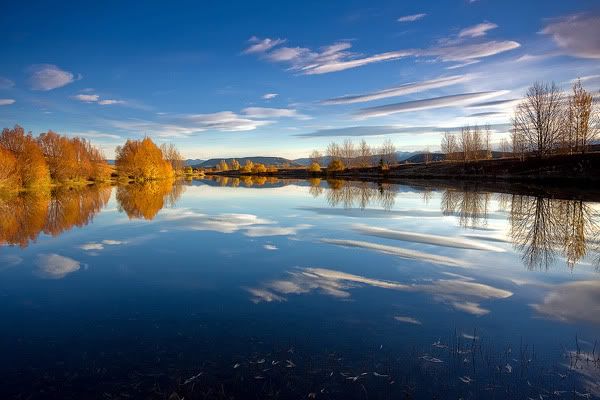
Front-lighting can make clouds really stand out.
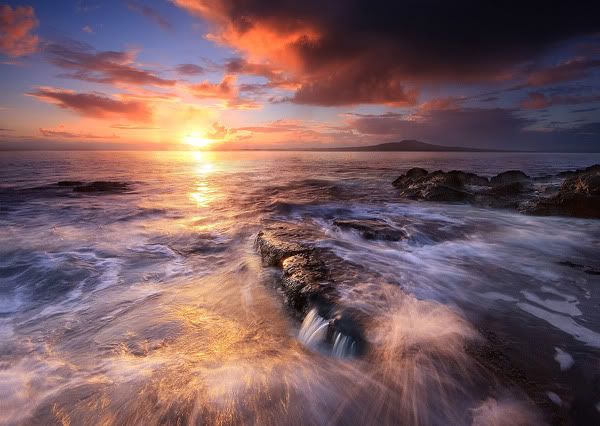
Shooting into the sun often produces dramatic results, if the flare is controlled.
Gear
One of the things I get asked a lot, especially by non-photographers, is what camera and lens I use. To me it’s a bit of a strange question – a bit like asking a painter what brand of brushes they use, or a builder what kind of hammers – but I suppose it’s understandable. The fact of the matter is the camera and lenses don’t make a huge difference in terms of the end result. Yes it’s true that high-end cameras produce higher resolution images with less noise, expensive lenses give you slightly sharper images etc, but unless you are making huge prints or pixel-peeping then they aren’t that important.
For the record, I currently use a Canon 40D and the lenses I use the most often are my Sigma 10-20 and Tamron 17-50. However some of my earlier shots were taking with a Canon 350D which has much lower specs than any entry-level camera available today yet still produced more-than-acceptable results.
Shot taken with a Canon 350D.
A tripod is an essential piece of equipment due to the fact that many shots will be taken in low light, resulting in shutter speeds that are too slow to hand hold. Other benefits of a tripod include allowing you to set up and compose a shot in advance, and also the ability to bracket your exposures (taking multiple shots of the same scene with different exposures).
Bracketing exposures is important when it’s not possible to capture the whole range of light in a single shot. For example, at sunrise and sunset the sky is usually several stops brighter than the foreground. Often the difference in brightness is too much for the camera to capture so compromises are made. Either the shadows are preserved at the expense of highlights or vice-versa – either way some details are lost.
By taking multiple exposures of the same shot, you can use post-processing techniques such as HDR or exposure blending to merge your exposures back into one, and for this it’s essential the camera doesn’t move in between shots – that’s why a tripod is so important. Almost all DSLR’s will have an Auto Exposure Bracketing (AEB) option that can be turned on via the menus.

A HDR image generated using 3 exposures.
By far my most-valued pieces of equipment are my filters – in particular my graduated neutral density (GND) filters. GND filters are rectangular filters that are half clear and half dark, with a graduated transition in between. The dark part is neutral in terms of color and its purpose is to reduce the intensity of the light in that part of the image (usually the sky). They come in various strengths (ranging from 1-stop to 4-stops) and are also available in soft-edged and hard-edged varieties. The soft-edged ones have a more gradual transition line and are more suitable when the foreground overlaps with the sky (e.g. mountains), whereas the hard-edged ones have a more abrupt transition line and suit scenes where the foreground and sky don’t overlap much.
I use GND filters in almost all of my sunrise/sunset photos, with the 3- and 4-stop hard-edged ones being the most-used. These filters balance out the difference in intensities between the sky and foreground and allow me to capture most shots in one exposure without needing to use HDR or exposure blending. I find it’s far more satisfying to capture an image in-camera rather than having to spend extra time in front of the computer to get the result I want.
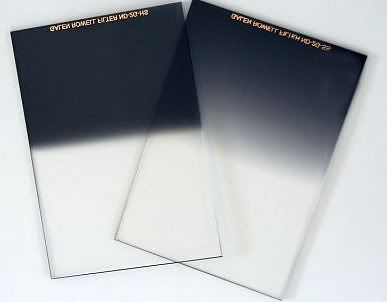
GND filters. Hard-edge (left), soft-edge (right).
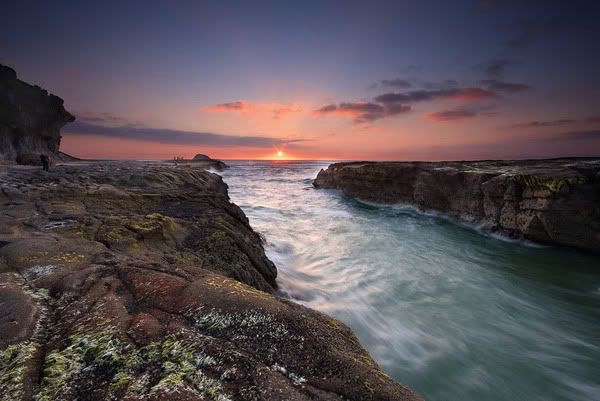
A 3-stop hard-edged GND filter balances the bright sky and darker foreground.
Another filter I use is a circular polarizer (CPL). The two primary uses of a CPL filter are to reduce glare (usually from water) and to enhance saturation in colors (e.g. blue skies, autumn leaves). This is one filter that cannot be replicated in post-processing.
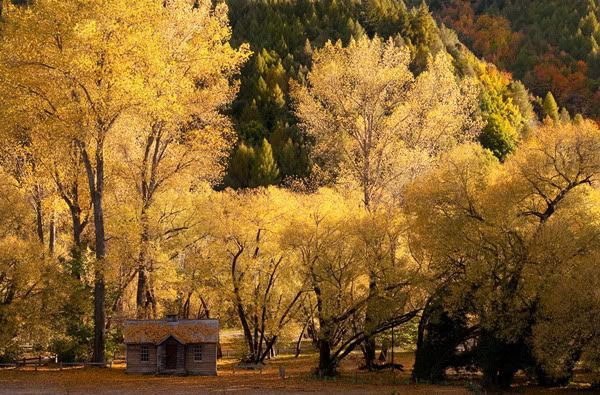
A CPL filter can maximize the colors of autumn leaves.
The final type of filter I use is a solid neutral density (ND) filter. This differs from a GND filter in that the whole filter is dark and its purpose is to reduce the amount of light across the entire image rather than just a portion of it. An ND filter is typically used to achieve a slower shutter speed than the light would normally allow. This is particularly useful for shots of flowing water as longer shutter speeds give water that smooth, ethereal look that a lot of photographers like.
ND filters come in different strengths with the most common being 3-stops (this reduces the amount of light hitting the sensor by 8 times). However there are also much stronger ones available such as the B+W ND110. This filter is 10-stops in strength, reducing the amount of light by 1000 times! These strong ND filters offer some creative opportunities to shoot in lighting conditions that would normally be too harsh for landscape photography, especially when there are fast-moving clouds or flowing water.
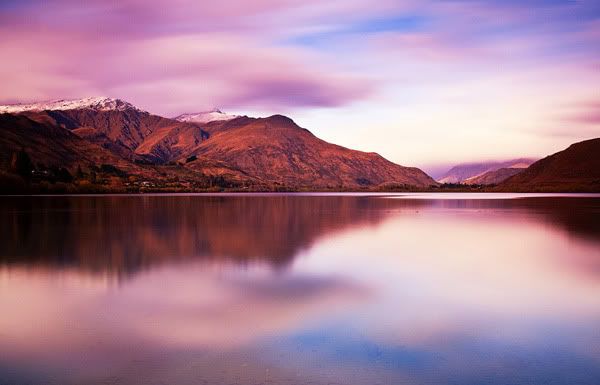
Lake Hayes, Queenstown. Taken with a 10-stop ND filter in bright light.
Using a 10-stop ND filter at sunrise allows for long exposures.
Post Processing
Because I shoot all my photos in RAW mode, they all have to be processed in some form or another. RAW images are, as the name implies, the raw, unprocessed information that the camera has captured. This is in contrast to shooting in JPEG mode where the camera automatically converts the RAW image into a JPEG file and performs post-processing (such as sharpening, saturation, contrast etc) for you. When people boast about their photos being ‘straight out of the camera’ or ‘untouched’ it usually means that they shoot in JPEG mode and let the camera process their photos for them. While it’s certainly a convenient option, and for certain types of photography where fast turnaround is required, a necessity, I think it’s better to take control of this processing yourself.
The main benefit of shooting RAW is that you have more information to work with. Once an image is converted to JPEG a lot of information is discarded and can never be retrieved, whereas a RAW file contains every single piece of information the camera was able to capture. This gives you more leeway to make exposure adjustments and also means you can process the same file in different ways. This can be useful when your post-processing skills improve (or new software techniques become available) and you want to reprocess older photos. RAW files are sometimes referred to as ‘digital negatives’.
The amount of post-processing you do is a personal choice. Some people prefer to do minimal processing such as sharpening, noise reduction and minor enhancements to contrast, curves, and saturation. Others like to use more of an artistic license to give their photos a surreal look (this is particularly true with a lot of HDR-enthusiasts). Personally I prefer to let the natural light do the talking rather than overpower it with post-processing. However, when the natural light was average to begin with or if I’m after a different look then I may experiment with different processing techniques. The majority of my shots would fall into the minimal post-processing category.
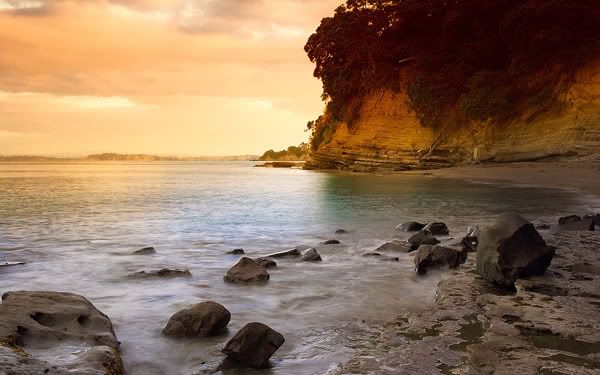
Good light means minimal post-processing.
Getting more creative with post-processing.
Summary
Taking good landscape photos is pretty easy when you think about it. It just comes down to being at the right place at the right time, and knowing some basic techniques to capture the scene. The most important thing is to get out often and take photos. The best way to learn is by making mistakes, but don’t forget to have fun while you’re doing it!
You can view my other photos on my Flickr stream or my website.
[via]
No comments:
Post a Comment